The Basics Of Punch Notching
In the early days of flintknapping,
I think we all have tried making notches in our flint
points with a punch. All to often and with the greatest
of ease, simply split the point in two or blow the
ear off. You only have to do this two or three times
to develop quite a rash.
Thank goodness for good friends and
flintknappers. About three years ago a knapper from
Texas named Dan Theus showed me a thing or two on
punch notching. Dan can notch most anything as deep
as he wants or needs to with this technique.
Using an Ishi stick or the smaller flakers has its
limitations, for example..."dog leg" notches,
thick points or very deep notching. Texas style Andice
points are a good example of this.
In the artifact world, it appears native American
Indians preferred punching their notches. This is
based on the flake scars of old points. Successful
punching produces large aggressive "c" shaped
flakes.
Now Lets take a look at the basic rules you must follow
for risk free notching. There are four basic factors
for success. These are: Platform setup, grinding,
strike angle and velocity. Lets look at basic platform
setup.
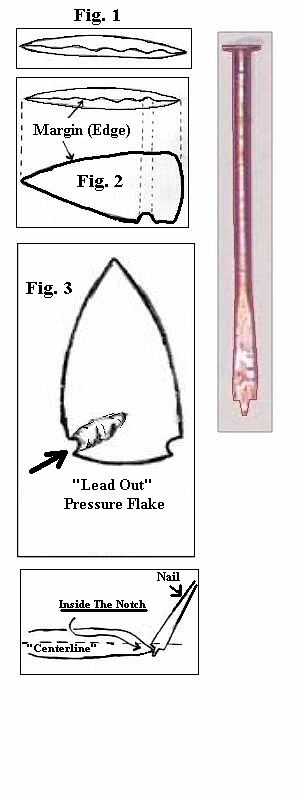
Fig.1 shows and view of the margin.
Note that the margin is not directly located on the
imaginary centerline, it is for the most part, closer
to the lower face of the preform. This would make
any flake removal(s) more successful and less risky.
The same thing applies to the tiny margin located
within the notch, in a much more critical way.
Look at fig.2. It shows the margin
being closer to the top face. (It's up-side-down)
The flake should be removed from the "top"
of the Bi-face. Having the platform edge below the
imaginary centerline is a must for punching! It is
the key!
To begin a notch, I like to use my ishi
stick to make a "lead out" flake. Shown
in Fig 3. This thins the notching area and can be
done to "lower" the platform edge, I like
to do this on both faces of the preform. This is not
necessary but it can be a big help. Keep in mind that
the notch platform is basically the same principle
as a standard thinning platform.
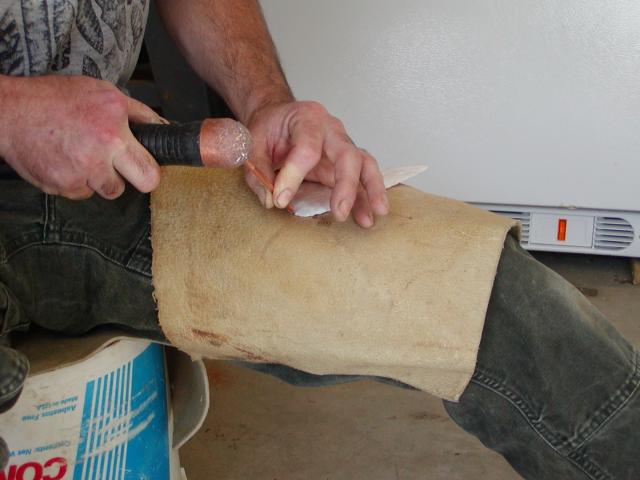
With your platform ready as described
above you must now abrade it. This is critical, even
if you are doing minor adjustments to relocate the
margin (something that you will occasionally have
to do after punching a flake) to favor flaking the
best face.
Take a look at fig.4. It shows the shoulder
on the nail resting in the notch ready to punch, note
that the nail shoulder is located at or slightly below
the centerline of the point. Screw this up and the
ear is gone! The nail will require file retouch after
a few flakes.
Make sure you're not biting too much
off by having to broad of a shoulder on your nail.
If you have a good low platform, whack the heck out
of it. You can use you billet, a chunk of wood, frozen
steak or what ever to hit the nail.
A few more tips. The "lower" the platform
the more you can change the angle to drive into the
preform, and vise versa. Faster hits for bigger flakes
and slower for smaller flakes. You can grind with
a small flake. The tricky part is readjusting the
margin to favor a face.
Good luck!!! Mark bracken